Today I share 7 unorthodox core exercises that will help you to improve your posture.
In fact, these exercises can improve your posture almost immediately!
But before we start…
2 Things That Stop You From a Good Posture
Posture is a pretty predictable thing…especially given that people in the western world have very predictable desk-centered lifestyles.
As a result of this lifestyle, there are 2 main patterns (first described by Vladimir Janda) that you need to be aware of…if you want to fix your posture!
Pattern 1: Upper Cross Syndrome
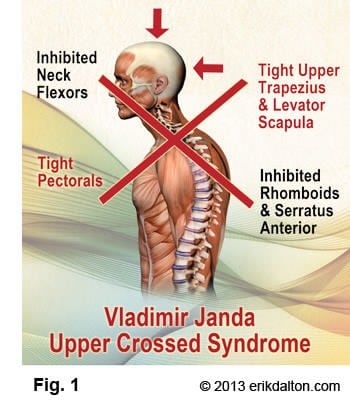
This one is very common for anyone with a desk lifestyle.
Please note that you don’t need to look that “bad” in order to actually have what Janda called an upper crossed syndrome.
In this posture you will have very overactive (and tight) Pectoralis muscles which will get you rounded shoulders.
Your neck will also suffer from tight traps and levator scapula muscles.
In my case that transformed into headaches and limited (almost shallow) breathing because pectoralis muscles are tense and inhibited.
So if you have been in a headache club without any specific reason, THIS might have been the culprit of your problem.
See also – Ergonomic Chair VS Normal Chair – What the Heck is the Difference?
Pattern 2: Lower Cross Syndrome

A very similar thing tends to occur in the hip area.
Weak underactive glutes (butt muscles) and overactive tight psoas muscle…
These two work together to literally spin your pelvis in a position where it starts producing back pain.
Add tight erectors (muscles that help to stabilize your spine) with weak abdominals and there you have it – a perfect bad posture!
To further top it up, you also need to know that these limitations and inhibitions can be unilateral!
So, your right glute might not be working properly whereas your left one might be totally fine.
This is when you might discover that your pelvis is somewhat rotated and your leg length is also different!
In fact, this exactly what I discovered to be the situation in my case.
Now that I got you all depressed about just how complex it can be, I am going to show you a framework (and not just a set of random core exercises) that should help you to reinstall your posture.
7 Advanced Core Exercises for Good Posture
The entire program has two parts.
- Stage 1: Release. We want to release inhibited muscles.
- Stage 2: Strengthen. We want to strengthen the ones that are underactive (or completely asleep).
Stage 1: Release
1. Pectoralis
Personally I love using something like a theracane to release thee muscles when lying down on my back.
In fact, you can easily using a simple stick that will do just about the same.
Here is how I do it.
- Lie down on your back
- Grab a stick (or a theracane if you got one)
- Find a tender spot in your pec area by going to the side away from your armpit
- Press down hard enough to feel the stick going through the fibers but not to the point when it really hurts
- Press down for at least 90 seconds (or longer)
- Go over different spots around your original point of pressure
And here are some tips.
- Don’t press too hard when you are just starting practicing these exercises! When I first started I wasn’t pressing much at all but with time, as my skin and muscles got used to the pressure, I was able to press harder; my muscles are more accustomed to this as well (i.e. they are trained) so they release a lot faster now as well
- Make sure you are relaxed enough to breathe fully! Breathing and releasing muscles (especially pectoralis minor) is THE thing you need to do to make it work.
- Try to move your hand when you are pressing down – this will allow to stretch those muscle fibers even further
Once you release your pectoralis, you might already feel a massive improvement in your posture, breathing and even…anxiety levels! (I certainly do).
I also recommend you consider getting yourself a posture corrector – a simple brace can help improve your posture pretty quickly.
2. Iliopsas
I found that iliopsas is a difficult muscle to understand because we can’t see it nor we can really feel it.
So, to keep it simple, I’d just say that iliopsas helps to bring your knee up when you walk.
Given that, stretching it is quite tricky and I put out an entire article on psoas release with Yoga.
However, I found that stretching upper quads (e.g. rectus femoris), a set of muscles that works to straighten your legs (i.e. extends your knees) produces great results so we are going to do this for some quick wins.
Here is an exercise that I stole from my Crossfit friends back in Berlin!
- Find a wall that you don’t really care about (as you’ll putting your feet on it :D)
- Place a soft mat right at the wall (I just take a standard Yoga mat and fold it once)
- Go down on your knees with the wall behind you and extend the leg you want to stretch backwards so your foot is sitting on the wall
- Press down with the knee of the leg you are stretching and hold the stretch for 1 minute
- Repeat for the same leg.
And some tips.
- Note any difference in how tight one of your legs can be compared to the other one
- Again, don’t go too crazy at the start – this is an advanced stretch
- I like rocking my leg back and forward so the stretch becomes a bit more dynamic\
3. Quads and Abdominals
This is one of the exercises I never really understood when I first tried it because it felt like it’s putting too much pressure on the lower back/spine.
However, I recently figured out the way this stretch should be taught to people. Instead of trying to extend your lower back, you should instead focus on stretching the quads and lower abdominals while breathing deeply with your stomach. The effect from that way of explaining the exercises was a big game changer. Here is what the exercise looks like.
- Lie down with your belly on the floor
- Position your hands as you were about to do a push-up (you might want to have your hands placed a bit higher – this would prevent hyperextension in the lower back)
- Gently push yourself off the floor while keeping the knees and the quads down. Try to fully extend your elbows. If you can’t do that, try to place the hands a bit further away forward
- Once you are in that position, start breathing as deep as possible but without too much effort (you don’t want to get dizzy). Focus on breathing through your nose and exhale with your mouth. Breathe with your belly (rather than with your chest).
- You will start sinking into the stretch soon enough – it should feel good so if you experience any pain decrease the intensity of the stretch or completely stop. You don’t want to injure yourself!
- Spend, at least, 90 seconds in the stretch…all while breathing as I described above.
- Once finished, gently bring yourself back on the floor and rest there for a few moments. This will allow your muscles to reactivate. Also remember to breathe!
Stage 2: Strengthen
3. Rhomboids
Now that we released your pecs, the anterior chain of your upper body, we can take care of the posterior chain – rhomboids.
One of the best exercises for this is horizontal shoulder abduction in prone position.
Here is how you do it.
- Lie down with your belly on the floor or on a Yoga mat
- Elevate your shoulders to a 90-degree angle
- Externally rotate your shoulders so that the thumbs are pointing upwards
- Now lift up you arms (while maintaining that position) and hold them for 5 seconds
- Do 20 reps
Some notes.
- At the start it’s especially hard to NOT use upper trapezius while performing the move. This is why it’s so important to maintain that “thumbs up” lock throughout the entire movement
- If you are ready to progress, take 2 tennis balls first (at this angle any dumble would be ridiculously heavy so you will end up using upper traps)
4. Glutes
One of the best exercises that helps to safely activate dormant buttocks is glute bridgres.
- Lay down with your back on the floor and knees bent
- Lift up your bum from the floor buy fully extending your hips and hold for 5 seconds
- Do 20 reps
Tips.
- Progress by using just one leg on each side
- You can also use some sort of weight but I don’t like it that much
5. Full Squats
Another great core exercise for improving posture is squats that go all the way down (i.e. “ass to grass”).
Caution: given the sedentary lifestyle many people are functionally unable to get down to the full squat (primarily men) or their biomechanics of doing the squat are not synced properly so the overall movement quality is very poor (primarily women). If you are able to sit in a full squat position without limitation, you are safe to proceed to full squats.
To do a full squat.
- Stand straight with your feet shoulder width apart
- Keep you trunk erect while slowly descending into a full squat
- Don’t relax your muscles at the lowest point and stand up again
- Do 20 repetitions
Notes and points.
- Yes, I know that everyone says these squats are unhealthy for your knees (which is total rubbish because toddlers naturally perform this type of squats)
- You must drop your bum lower than your knee level while keeping your trunk erect – this is the only way your glutes will really turn on!
6. Abs: Bear Walks
I am not going to include a plank, Russian twists or any other exercises that is only useful for anyone that’s doing some sort of rehabilitation.
Given this is an “advanced” article, I want to talk something more serious.
Let’s start with bear walk!
- Assume your quadrupled position with your hands and feet touching the floor at 4 points
- Using counterlateral walking pattern start “walking” forward like a bear would
- Move forward for 30 ft (10m)
- Then go backwards (with your feet leading the way)
- Repeat the above 3 times

Tips and notes.
- Animal movement patterns (e.g. bear walks) are extremely useful at DYNAMICALLY stabilizing your core which keeps it working while you are walking normally; this is why I don’t like planks – our body is never static so why would people spend so much time on it and not progress (i.e. start doing bear walks)
- Walking backwards can be more challenging than moving forward as you will be engaging your serratus anterior (a set of muscles that’s typically dormant in upper cross syndrome) – so definitely do this part of the exercise!
The last walking pattern for today – advanced bear walk (or whatever that’s called).
7. Abs: Advanced Bear Walks
Here is how you do it:
- Assume the same position as with bear walks but now keep your knees as close to the floor as possible
- Now move forward for 30ft (10m) and return backwards (with your feet leading the way again)
- Do this set 3 times
Notes and tips.
- Really try to keep the knees in that position during the entire duration of the movement – the goal is to stabilize your trunk while moving forwards and backwards
- Smaller steps give you more control – use them
Final Words
Today I showed what’s holding your poster improvements back (Janda’s upper and lower crosses).
You also learned how to release the muscles that are pushing you towards pain and strengthen muscles that pull you into a proper alignment.
I recommend you do these exercises, at least, daily and you will soon start seeing positive results.